



 Fabian Lainé

Equipment
Stardew Valley Forge Guide: Enchantments & Forging Explained
In brief
The Volcano Forge transforms your tools and weapons into definitive versions, but the game doesn't tell you anything about it. Between random enchantments, three separate currencies, and Prismatic Shard traps, you need to know where to look for resources and in what order to spend them. This guide keeps you from burning your best gems on a tool you'll forget in the chest.
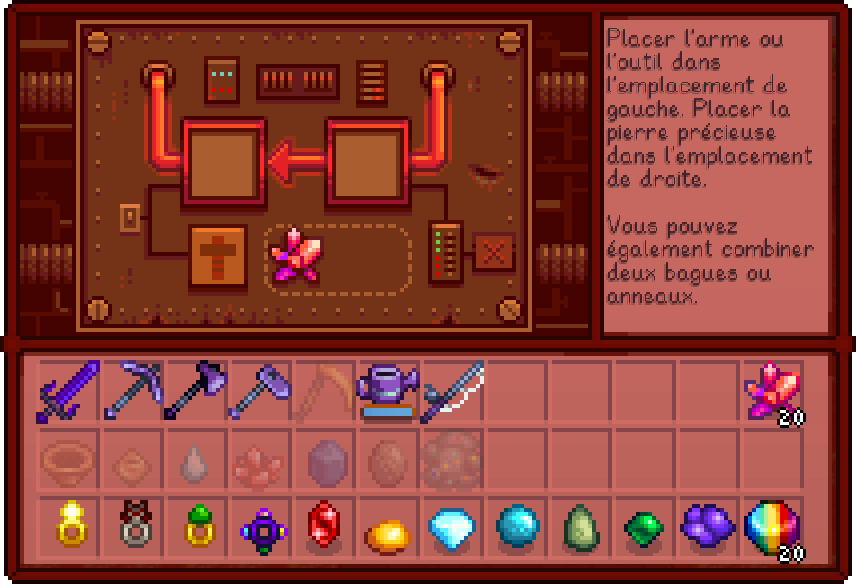
The Forge is the only place in Stardew Valley that turns a good tool into a definitive one. It sits at the heart of the volcano crater, on Ginger Island, and provides four distinct services: enchanting tools and weapons, forging melee weapons with gems, combining two rings into one, and copying the appearance of one weapon onto another.
The problem is that the game explains nothing. Enchantments drop at random, the fees change depending on the operation, and many farmers burn their Prismatic Shards on tools they never take out of the chest. Here's the complete rundown of the system, backed by figures from the French-language wiki, and above all the order in which to spend your resources.
Calendar note: as of August 10, 2026, the stable version remains 1.6.15. Version 1.7 is confirmed to be in development, with no announced date, and none of what follows depends on it.
Getting there, then never having to go back
The Forge is located inside the Volcano Dungeon. This dungeon has no ladder and no instant exit: each floor has an entrance door and an exit door that must be found, and to get back out you have to retrace your steps, unless you use a Warp Totem or the Return Scepter. Passing out at 2:00 AM on the spot wakes you up the next day on the Ginger Island farm, minus 2,500g.
The good news is that this trip becomes optional. Once you've obtained Combat Mastery, you can craft a Mini-Forge, strictly identical to the Forge, and place it wherever you want: in the house, in the shed, next to the furnace. That's the best argument for completing the Combat Mastery track first.
In the meantime, two shortcuts to the island exist: the Warp Totem: Island (5 Hardwood, 1 Dragon Tooth, 1 Ginger; recipe sold for 10,000g by the Volcano Dwarf) and, for already wealthy farms, the Island Obelisk, at 1,000,000g plus 10 Iridium Bars, 10 Dragon Teeth, and 10 Bananas.
The Forge's three currencies
Everything done here is paid for in one of these three resources.
- Cinder Shard: the common currency. It's mined from cinder shard deposits in the Volcano Dungeon, and drops from Magma Sprites, Magma Sparkers, Lava Lurkers, and False Magma Caps. An often-forgotten passive source: a fish pond stocked with more than 7 stingrays produces them on its own. Sale value, 50g: safe to say they're never sold.
- Prismatic Shard: the bottleneck, since each enchantment consumes one. The best rates come from far in the Mystic Stones, found at level 100 and beyond in the Mines, the Skull Cavern, and the Quarry: 25%. Next come the Iridium Nodes in the Skull Cavern, the Quarry, and the Volcano Dungeon, as well as treasure rooms in the Skull Cavern, at 4% each. Omni Geodes only give 0.4%, Serpents and Mummies 0.1%, Shadow Brutes and Shadow Shamans 0.05%. Finally, a pond with at least 9 Rainbow Trout has a 0.09% chance per day of producing one.
- Dragon Tooth: reserved for innate enchantments. It's picked up off the ground near the dragon skeleton in the Volcano Dungeon, and drops from Lava Lurkers with a 15% chance.
Practical corollary: if you're running low on Prismatic Shards, it's not the volcano you should head to, but the Skull Cavern, with bombs and an iridium pickaxe, to break Mystic Stones.
The full price list, operation by operation
| Operation | Cost |
|---|---|
| Random enchantment (tool or weapon) | 1 Prismatic Shard + 20 Cinder Shards |
| Innate enchantment (melee weapon only) | 1 Dragon Tooth + 10 Cinder Shards |
| Weapon forging, 1st / 2nd / 3rd level | 1 gem + 10 / 15 / 20 Cinder Shards |
| Combining two rings | 20 Cinder Shards |
| Changing a weapon's appearance | 10 Cinder Shards |
| Infinity Weapon (3 forges) | 3 Galaxy Souls + 60 Cinder Shards |
| Re-crafting a trinket (Anvil) | 3 Iridium Bars |
| Undoing a forge | Free, with partial refund of shards |
Forging a weapon: which gem for which use
A dagger, hammer, or sword can be forged three times, and nothing forces you to use the same gem all three times. Here's what each one brings, per forging level.
| Gem | Effect per level | Verdict |
|---|---|---|
| Ruby | +10% damage, minimum and maximum | The safe bet, even for a beginner |
| Aquamarine | +4.6% critical strike chance | Excellent on a dagger, which strikes fast |
| Jade | +10% critical damage | Only worthwhile combined with crit chance |
| Emerald | Strike speed: +2, then +3, then +2 | Makes a slow hammer genuinely playable |
| Topaz | +1 defense | Comfortable on long descents, weak in damage per second |
| Amethyst | +1 knockback | Trivial, unless it's a personal preference |
| Diamond | Applies all 3 levels at once, with random stats | 10 Cinder Shards total instead of 45 |
The Diamond deserves a closer look. It only costs 10 Cinder Shards and maxes out the weapon immediately, at the cost of control: the three levels land randomly. On a transitional weapon, it's the best time-to-result ratio in the game. On the one you plan to keep until the end, take the time to choose: three Rubies, or two Aquamarines plus one Jade on a dagger.
Tool enchantments: the real hierarchy
A Prismatic Shard and 20 Cinder Shards apply a random enchantment. You don't choose, but the game also won't give you the same thing twice in a row: on a given tool, the last two enchantments obtained are excluded from the next draw. Rerolling costs one more shard, but the pool empties out.
Two details change everything. First, upgrading a tool keeps its enchantment: there's no need to wait for the iridium version, an enchanted gold pickaxe will stay enchanted after going through Clint's. Second, the Scythe, the Golden Scythe, the Iridium Scythe, and the Trash Cans cannot be enchanted — so the scythe given by the Masteries will remain unenchanted.
| Enchantment | Tools affected | Effect |
|---|---|---|
| Bottomless | Watering Can | Infinite water |
| Efficient | Axe, fishing rod, hoe, pickaxe, watering can | No longer consumes energy |
| Swift | Axe, hoe, pickaxe | Tool is 33% faster to use |
| Powerful | Axe, pickaxe | +1 tool level for the pickaxe, +2 for the axe |
| Reaching | Hoe, watering can, pan | Charged area extended up to a 5x5 grid |
| Shaving | Axe | +3 wood on oaks, maples, pines and palm trees; hardwood on mahogany trees |
| Archaeologist | Hoe, pan | Artifact chance doubled with the hoe, x3.5 with the pan |
| Generous | Hoe, pan | 50% chance to double dug-up items |
| Master | Fishing rod | +1 Fishing level while the rod is equipped |
| Preserving | Fishing rod | 50% chance not to consume bait and tackle |
| Auto-Hook | Fishing rod | Hooks automatically and starts the mini-game |
| Fisher | Pan | 10% chance to pull up a fish from the water source |
If we had to rank them: Bottomless on the watering can is the only enchantment that purely and simply removes a daily chore, and it has no rival since it can only ever appear on that tool. Efficient on the pickaxe comes right after, because it changes the very nature of runs through the Skull Cavern: no more energy bar to watch, just the clock. Powerful on the axe, worth two tool levels, is the best metal-saving trick in the game. Pan enchantments, meanwhile, are only worth it if you're still hunting artifacts for the museum.
Weapons: combat enchantment and innate enchantment
On a melee weapon, the two systems stack: a regular enchantment and an innate enchantment can coexist on the same blade.
On the combat enchantments side, there are five options, reserved for melee weapons — slingshots aren't eligible:
- Haymaker: reduces the special attack's cooldown by 50%, stacking with the Acrobat profession for 75% total.
- Bug Killer: doubles damage against bugs, grubs, flies, spiders and rock crabs, and above all lets you kill armored bugs.
- Crusader: +50% against mummies, ghosts, skeletons and shadow spirits, and spares you from having to blow up mummies. This is the Skull Cavern enchantment.
- Vampiric: 9% chance to recover health on every kill, between 9% and roughly 10.67% of the monster's maximum health. The healing doesn't depend on the weapon's damage, which makes it fearsome on a fast dagger.
- Crops-mower: 50% chance for fiber when cutting weeds and 33% extra hay. Useless in dungeons, very handy on the farm.
As for innate enchantments, they cost one Dragon Tooth and 10 Cinder Shards, only apply to melee weapons below level 15, and never to galaxy weapons or infinity weapons. They're split into two pools. The first, not guaranteed, contains Defense +1-2, Weight -1-5 and Slime Collector. The second always triggers: Slime Killer, Crit. Power +25/50/75, Crit. Chance +1-3, Attack +1-5 or Speed. In other words, a Dragon Tooth spent on a weapon with no innate enchantment is never fully wasted.
Merging two rings
For 20 Cinder Shards, two different rings become a single ring that combines both effects. This frees up a slot, and that's the whole point: wearing four effects instead of two. There are two restrictions, but they're strict. You can't combine two copies of the same ring, nor combine a ring that's already been combined. However, two distinct rings with identical effects do work — the Small Glow Ring and the Glow Ring, for example, whose light radii stack.
The classic pairing combines an offensive effect with a survival effect: the Warrior Ring with the Vampire Ring, or the Yoba Ring with the Savage Ring. And if you make a mistake, undoing the combination gives you back both original rings, for free.
The Anvil: reforging your trinkets until you get the right roll
The Anvil, also unlocked by Combat Mastery, reforges a Trinket for 3 Iridium Bars and 10 minutes of gameplay. It doesn't change the trinket, only its stats. Two exceptions: the Basilisk Paw and the Magic Hair Gel don't get reforged.
What can be re-rolled, and at what actual cost:
- Fairy Box: the fairy's level, from 1 to 5. Watch out for the trap — level 5 only appears 2.44% of the time. On average, that means about forty reforges, or roughly 123 Iridium Bars. At that price, a level 4 (5.16%) is a very good place to stop.
- Golden Spur: the duration of the speed bonus, from 5 to 10 seconds, with six equally likely values. Six attempts on average, 18 bars: this is the most cost-effective reforge of the bunch.
- Ice Rod: the projectile frequency (3 to 5 seconds) and the freeze duration (2 to 4 seconds), rolled independently down to the millisecond. You'll never hit the perfect value; just aim for better than what you have.
- Mystic Quiver: the variant — normal, perfect, quick, or heavy.
- Parrot Egg and Frog Egg: the parrot's level, up to 4, and the frog's color, which is purely cosmetic. The prismatic frog only appears 1.6% of the time, while the green one comes up on its own 41.3% of the time.
Where to start if you only have three shards
The right order to spend them isn't the most intuitive one. Put the first shard on the watering can, hoping for Bottomless: it's the only enchantment that gives you back real time every morning. The second on the pickaxe, where Efficient and Swift are both good results. The third on the axe, where Powerful and Shaving get you extra wood with every chop.
Save your Dragon Teeth for the weapon you actually use below level 15, and the Diamond for transitional weapons you'll be replacing. Finally, place the Mini-Forge as soon as Combat Mastery drops: the real cost of the Forge isn't the shard, it's the round trip to the volcano.
Share this article
Where do you stand with the Forge: did you already have it mastered before this guide, or was it really blocking you?
Frequently asked questions
How do I access the Forge without wrecking my legs every time?
Craft a Mini-Forge as soon as you unlock Combat Mastery: it works exactly like the real one and can be placed wherever you want. In the meantime, use Warp Totems (recipe for 10,000g from the Volcano Dwarf) or, if you're rich, the Island Obelisk for 1,000,000g.
I have very few Prismatic Shards. Where's the most efficient place to farm them?
Mystic Stones beyond level 100 in the Mines and in Skull Cavern give a 25% chance, far better than Iridium Nodes (4%). Gear up with an Iridium Pickaxe, stock up on bombs, and break stones systematically.
Which tool enchantment should I prioritize?
Bottomless on the Watering Can removes the biggest daily chore and has no real competition. Next, Efficient on the Pickaxe (infinite stamina in Skull Cavern), then Powerful on the Axe (+2 levels = major metal savings). Fishing enchantments are only worth it if you're still hunting artifacts for the museum.
Do I really have to forge my weapon with the same gem three times?
No, you can mix them: two Aquamarines plus one Jade on a dagger for speed and critical hits, or three Rubies for a safe bet. Diamond forges in one go for 10 Cinder Shards instead of 45, but the results are random.
Why won't my scythe accept any enchantment?
Scythes, trash cans, and specialized farming tools don't accept enchantments. It's a game trap: you can grind for enchantments, but you need to choose your weapons and tools before investing in them.
Key takeaways
- Unlock the Mini-Forge via Combat Mastery first: it's the best investment to stop making the trip to the volcano
- Mystic Stones at level 100+ in the Mines and Skull Cavern give a 25% chance of Prismatic Shards, far better than the volcano
- Bottomless on the Watering Can removes the biggest daily chore; Efficient on the Pickaxe completely changes Skull Cavern runs
- Diamond forges a weapon in one shot for just 10 Cinder Shards, perfect for a transitional weapon; definitive weapons deserve more control
- You can only enchant a weapon once at random, but the game excludes the last two results from the next draw
Comments
No comments yet. Be the first to react!
Leave a comment
Similar guides



Latest articles








Your opinion counts
Rate Stardew Valley
Click a star to rate