



 Fabian Lainé


Build
The Adventures of Elliot: magilith guide — fragment farming, assembly rank and cost budget
In brief
Magiliths are the only true progression lever in The Adventures of Elliot, but their system relies on two antagonistic resources: fragments for crafting, tuls for expanding the box. This guide breaks down the mechanic to show you how to farm efficiently, what rank to aim for, and how to allocate your budget without wasting it.
The Adventures of Elliot: The Millennium Tales has no levels to grind. No experience points, no stats to allocate: Elliot grows stronger because he finds better weapons, because he picks up Life Shards that extend his vitality gauge, and because he equips magiliths. The first two depend on progression and exploration. The third is the only lever you actually control, from the beginning to the end of the adventure.
It's also the most misunderstood, because it relies on two resources and two counters that don't move at the same pace: fragments, used to craft magiliths, and tuls, used to expand the box meant to hold them. Stockpiling stones with no budget to equip them is pointless; paying for the box without having good stones to put in it is just as pointless.
Here's how to split your effort between the two, where to find fragments without spending your whole evening on it, and which effects to aim for on each of the seven weapons. Everything below is accurate as of August 9, 2026: the latest published update remains 1.1.0 from July 10, which changed nothing about the magilith system.
The magilith box is a cost budget, not a number of slots
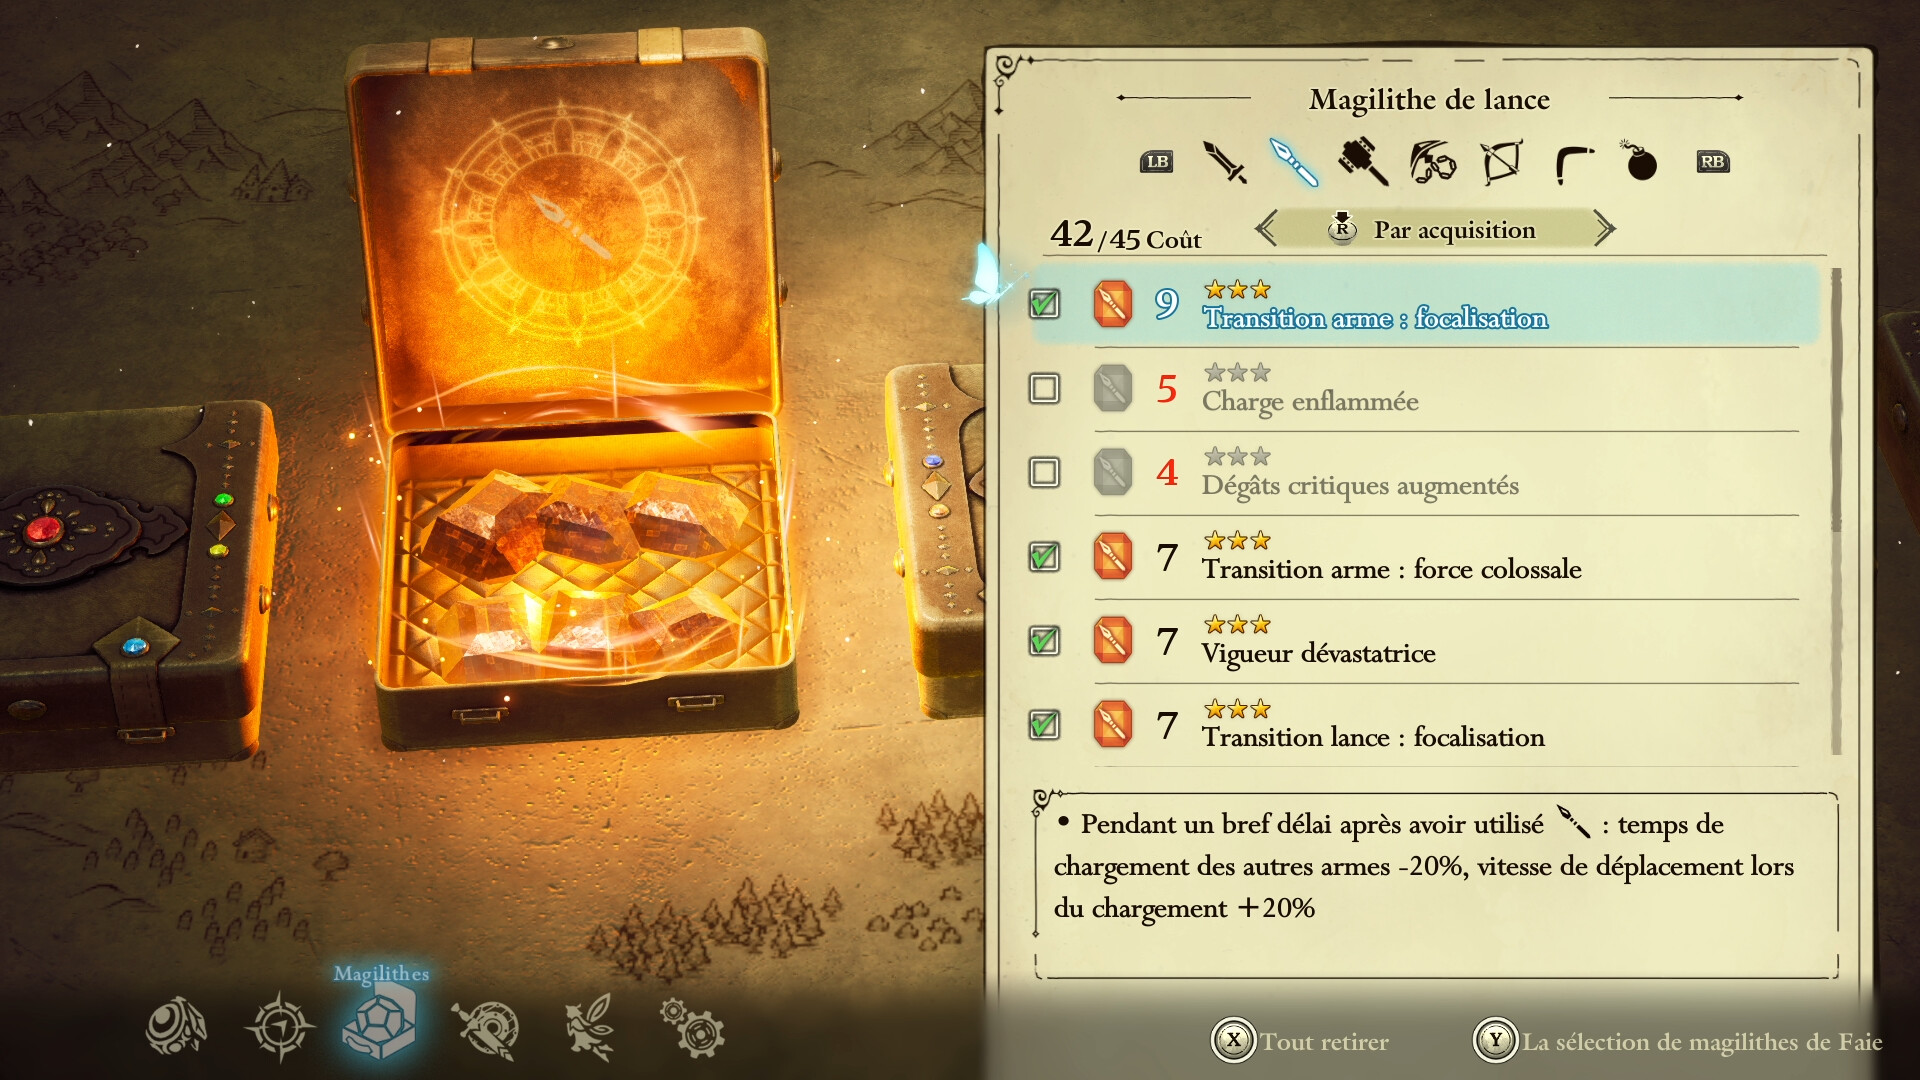
Each magilith displays a cost next to its name, and the box sets a total you can't exceed. It really is a budget, not a series of slots: a stone worth 9 points consumes as much as two stones worth 4 and 5 points. As soon as the counter gets close to the cap, magiliths that are too expensive turn red in the list and become impossible to select.
The box starts at 15 points. Nine upgrades bought from the magilith merchant bring it up to 60 points, in increments of 5, for a total of 42,500 tuls. This is by far the biggest currency expense in the game, and the only one that permanently increases your power: everything else costs a handful of hundreds of tuls.
Two clarifications completely change how you should approach this screen:
- Each weapon has its own selection and its own budget. Loading up the sword never deprives the bow, spear, or bombs: there's absolutely no point in unequipping one weapon to strengthen another. Gaining a box level therefore benefits all seven weapons at once.
- Faie also has her own selection, accessible from the same menu via the "Faie's Magilith Selection" option. Many players don't discover it until twenty hours in.
One last point that's often overlooked: for the same effect, a higher star-rank magilith is more powerful and generally costs fewer points. Replacing an old stone with its high-rank version frees up budget instead of consuming it. This is why expanding the box early and having a high crafting rank reinforce each other.
Crafting rank: spend your fragments right away
A random craft costs 5 fragments and draws a random stone from the entire catalog. Starting at rank 5, targeted crafting for a specific weapon unlocks, for 10 fragments. Every craft raises this rank, which English-language guides call the Form Rank, and it's what determines the rarity you get.
The gap between the extremes is severe. At rank 1, nine stones out of ten come out as 1-star. At rank 10, the draw only ever produces 4-star (60%) and 5-star (40%): it becomes impossible to get a bad result. In between, the curve is linear, but the total climbs fast.
| Rank reached | Fragments for the next rank | Total spent |
|---|---|---|
| 1 → 2 | 50 | 50 |
| 2 → 3 | 200 | 250 |
| 3 → 4 | 350 | 600 |
| 4 → 5 | 500 | 1,100 |
| 5 → 6 | 750 | 1,850 |
| 6 → 7 | 1,000 | 2,850 |
| 7 → 8 | 1,300 | 4,150 |
| 8 → 9 | 1,600 | 5,750 |
| 9 → 10 | 2,000 | 7,750 |
Remember the number at the bottom: 7,750 fragments spent to lock in the maximum rank. This isn't an amount to set aside, it's a volume to keep flowing through. Hence the one real rule of this system: never hoard. A player who keeps 300 fragments "for later" always ends up pulling 1- and 2-star results when they finally spend them, while someone who has been assembling continuously in batches of 5 from the early hours is already pulling 4-star results at the same point in the game.
The safety net is built in: duplicates are automatically converted back into fragments once assembly is complete. So you lose nothing by assembling blindly very early on, even without knowing which weapon you'll end up using. Manually disassembling a unique stone, on the other hand, is almost always a bad deal: the return is low and the effect is lost for good. For the more thrifty players, a manual save before a series of assemblies lets you reload if the draw goes badly — though that's pointless at rank 10, where the worst possible result is still a 4-star.
Farming fragments: the Loot Bonus does all the work
Fragments drop from enemies, blue chests, quests, and bosses. But the amount dropped by a regular enemy depends on a single parameter: your Loot Bonus level, the kill chain displayed in the top left of the screen. It rises as long as you keep chaining victories without taking a single hit, and drops back to zero the moment you get hit.
| Tier | Enemies chained | Loot rate | Extra items |
|---|---|---|---|
| 1 star | 5 | x1.25 | +2 |
| 2 stars | 15 | x1.5 | +4 |
| 3 stars | 30 | x1.75 | +6 |
The chain continues up to 99 kills, after which it no longer progresses but keeps the maximum rate. In practice, thirty weak enemies cleanly dispatched are worth more than ten tough enemies that hit you once. A few mechanics worth knowing:
- Fast travel respawns enemies without resetting the chain. That's the farming loop: clear a field area full of melee opponents, teleport, start again.
- Bosses don't count toward the consecutive kill tally, but a hit taken during their fight still breaks the chain regardless. Clear your zones before the dungeon, not after.
- A dungeon boss alone drops around fifty fragments. On a first playthrough, bosses account for the bulk of your stockpile.
- On the accessory side, three pieces change the game: the one that increases dropped fragments (Crystal Badge in English-language lists), the one that stops the chain from breaking on the first hit taken (Lotus Chain), and the accessory for Digital Deluxe edition owners that boosts both tuls and fragments at once (Departure Brooch). As for the tuls side, the reward obtained at 35 cats found simply doubles the money dropped by enemies.
Temple trials: once for the rewards, not for the yield
The temple offers four trials of increasing difficulty, with 5, 8, 10 and 12 floors respectively, and an entry fee in tuls. The first clears grant the essentials: two of them each unlock an extra accessory slot, the third a shield that improves recovery, and the last the honorary end-game reward. Dying simply sends you back to the entrance, with no penalty. Subsequent runs, though, only yield magiliths in exchange for a paid ticket: a decent bonus once you're already rich in tuls, but never a substitute for a well-run Bonus Loot loop.
Which magiliths to aim for, weapon by weapon
The French client names magiliths descriptively: for instance, you'll find "Increased Critical Damage" (cost 4), "Flaming Charge" (cost 5) or "Devastating Vigor" (cost 7) in the spear tab. International databases, on the other hand, reference these stones under their English labels. The table below therefore describes the intended effect — the one that matters for building — alongside the English label, so you can find the stone in online lists.
| Weapon | Effects to prioritize | English labels |
|---|---|---|
| Sword | +10% damage, projected slashes 50% wider, knockback aura on every charge | Unguarded Mayhem, Wide Blade, Fighting Spirit |
| Spear | normal attack split into three directions, extra attack and +20% critical above 90% health | Three-Headed Dragon, Magic Spear, High Spirits |
| Hammer | guaranteed critical on the special attack, +30% radius, explosion on every enemy defeated | Body & Soul, Wide Impact, Blast |
| Chain Sickle | recovers one health point on the special below 3 health, +30% damage on specials, normal attack that hits twice | Succor Stance, Risky Gamble, Double Swing |
| Bow | extra attack on nearby enemies, guaranteed critical under 10 arrows in reserve, 20% chance to ignite | Linked Arrows, Final Shot, Fire Shot |
| Boomerang | +10% damage per hit in flight up to +50%, 5% stun, extended flight duration | Hit Count, Electric Boomerang, Long Throw |
| Bombs | +50% size and blast radius, -50% damage taken from your own bombs, one additional simultaneous bomb | Aggrandize, Self-Destruct Resistance, Bomb Master |
Two approaches stand out. Melee weapons stack raw damage percentages, easy to equip and profitable from the midgame onward. Ranged weapons revolve around a trigger: igniting a target with the bow to activate the stones that reward status effects, or keeping the boomerang airborne to stack its hit bonus. More demanding on the budget, they scale noticeably higher.
The detail almost no one uses: transition magiliths
Elliot carries two weapons at all times and switches between them instantly. An entire family of magiliths rewards exactly this switch, under the name "Weapon Transition" or "Transition weapon name". A concrete example in the spear tab: "Weapon Transition: Focus", a 3-star stone costing 9 points, reduces the charge time of other weapons by 20% and increases movement speed by 20% during that charge, for a brief window after a spear strike. Its neighbors "Weapon Transition: Colossal Strength" and "Spear Transition: Focus" cost 7 points each.
These stones are useless if you stick to a single weapon, but they transform a well-chosen duo: a melee weapon to open, a heavy or charged weapon to finish, with shortened charge time and mobility preserved during the charge. This is the least explored angle in current guides, and the most profitable once the grid goes above 40 points, since you need the room to combine transition and raw damage.
Where to actually start
If you're starting a run or have set the system aside, the priority order fits in four lines. First, assemble in batches of 5 fragments as soon as the shop becomes accessible, without overthinking the outcome: the goal for the first ten hours is rank 5, not the perfect stone. Then place your first tuls in the grid, whose entry thresholds are trivial compared to the payoff. Get in the habit of raising Loot Bonus to three stars before any exploration session, by clearing a zone of melee enemies with successive teleports. And systematically go back through the menu after picking up each new weapon: it arrives with an empty budget that your already-assembled stones can fill immediately.
It's a system that forgives little, but punishes only one thing: hesitation. Fragments kept aside are worth nothing, and neither are tuls. Everything you spend early comes back to you in the form of rarity and budget over the following fifty hours.
Share this article
At what point in the game did you understand the magilith system?
Frequently asked questions
Should I empty my magilith budget before expanding the box?
No, quite the opposite. Expanding early benefits all seven weapons at once, and high-rank magiliths cost fewer points than their low-rank counterparts for the same effect. An expanded box and a high crafting rank reinforce each other.
Should I really craft in the first few hours, or can I stockpile my fragments?
Craft immediately. A player who hoards is still pulling 1- and 2-star items late in the game at the same point when someone who crafted continuously in batches is already pulling 4-star items. Duplicates automatically convert back into fragments, so you lose nothing by crafting blindly.
How do I maintain a Loot Bonus chain without getting hit?
Clear zones of weak enemies in one hit, then use fast travel to respawn them without resetting the chain. Bosses don't count toward the tally but will break the chain if they hit you: clear your zones before entering the dungeon.
Are fragment accessories really worth it?
Absolutely. The badge that increases dropped fragments, the one that protects the chain on the first hit, and the Departure Brooch all boost your yield at the margins, but the real multiplier is the reward for finding 35 cats, which purely doubles enemy gold.
Is it better to dismantle an old magilith or craft to get a better one?
Craft. Manual dismantling yields little and you lose the effect permanently. Let duplicates convert automatically and focus on continuous crafting to raise your rank.
Key takeaways
- The magilith box works on a cost budget, not slots: each weapon has its own independent cap, and two high-rank versions free up your budget instead of consuming it.
- Craft your fragments continuously from the start of the game, never in a late-game mass session: going from rank 1 to rank 10 requires 7,750 fragments, but the quality gap between low rank and high rank makes procrastination punishing.
- The Loot Bonus is your only lever for farming fragments: maintain a kill chain without taking a hit, use fast travel to respawn enemies, and clear zones before boss fights.
- Bosses drop fifty fragments on their own and fund ten random crafts; they're your biggest source on a first playthrough, far more than an ordinary farming loop.
- Temple trials are worth a first visit for the structural rewards, but never for chain-farming: they're a decent supplement when you're rich in tuls, not a collection strategy.
Comments
No comments yet. Be the first to react!
Leave a comment
Similar guides






Latest articles







Your opinion counts
Rate The Adventures of Elliot: The Millennium Tales
Click a star to rate