



 Fabian Lainé


Equipment
Genshin Impact: Scarlet Proof vs Heart of the Furnace, Which to Farm
In brief
Version 7.0 introduces two radically different artifact sets for astral reactions: Heart of the Furnace, a true team buff that works even off-field, and Scarlet Proof, a selfish set reserved for the Astrodyne trigger. Understanding this distinction by August 12 will save weeks of farming.
Version 7.0 Unforgiving Eternal Winter opens up Snezhnaya on August 12, and it arrives with two brand-new artifact sets: Scarlet Testimony and Ember Heart. Both come in 4★ and 5★ rarities, both drop in the same location — the Reversed Glacier artifact dungeon, located in the Permafrost Sheet of Snezhnaya — and both revolve around Stellar reactions, the family that groups together Stellaric Conduction (Cryo + Electro, introduced in Luna VIII) and Stellaric Dispersion (Anemo + Cryo, new in 7.0).
The trap would be to think they're interchangeable. They absolutely are not. One buffs the whole team and keeps working even when its holder is off-field; the other only benefits the character who triggers the reaction, and only on Stellaric Dispersion. Getting the holder wrong means losing half the gain for several weeks, because a 4-piece set is infinitely slower to re-farm than a weapon is to replace.
Here are the official texts published by HoYoverse, what they actually mean once controller is in hand, who should wear what from day one, and the three things to do before Wednesday so as not to waste Resin.
The exact effects of the two sets
The wording below comes from the official French presentation of the new 7.0 artifacts, published online on August 5. It will be confirmed in-game on August 12.
| Set | 2-piece | 4-piece |
|---|---|---|
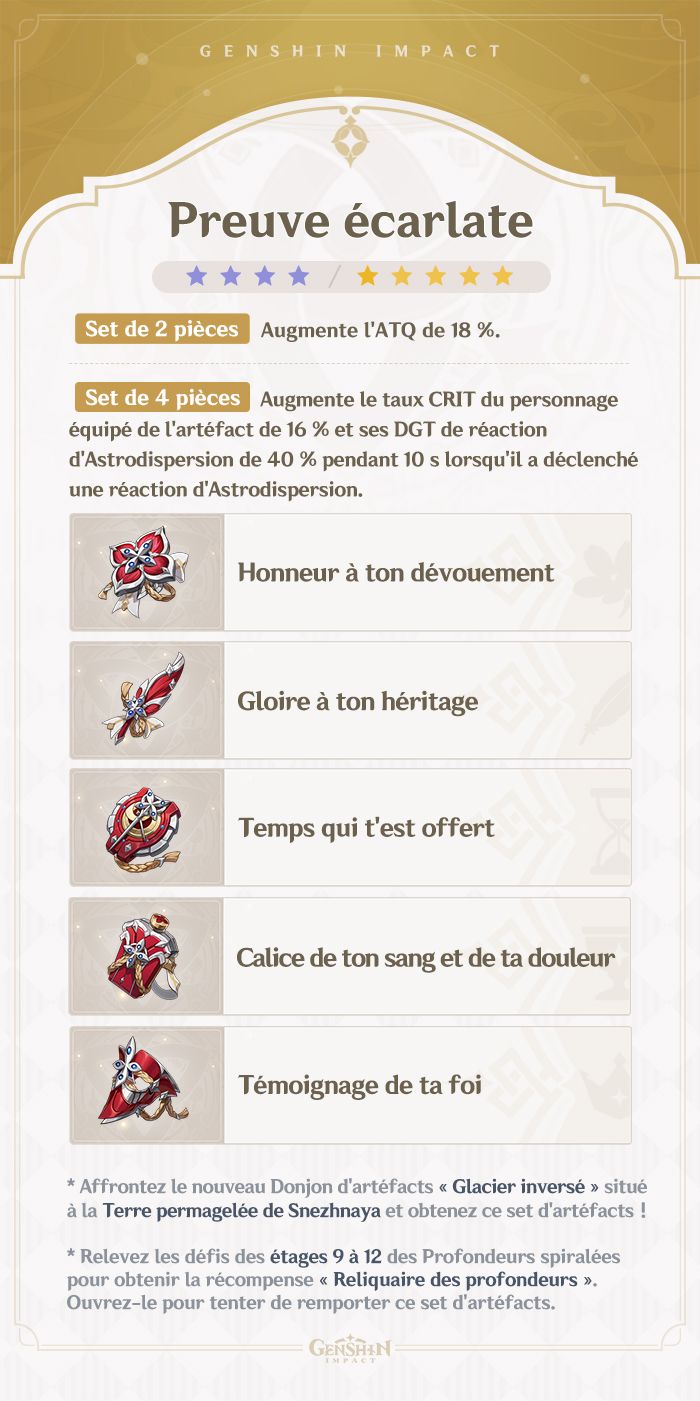
| Scarlet Testimony | Increases ATK by 18%. | Increases the equipping character's CRIT Rate by 16% and their Stellaric Dispersion reaction DMG by 40% for 10s after they trigger a Stellaric Dispersion reaction. |
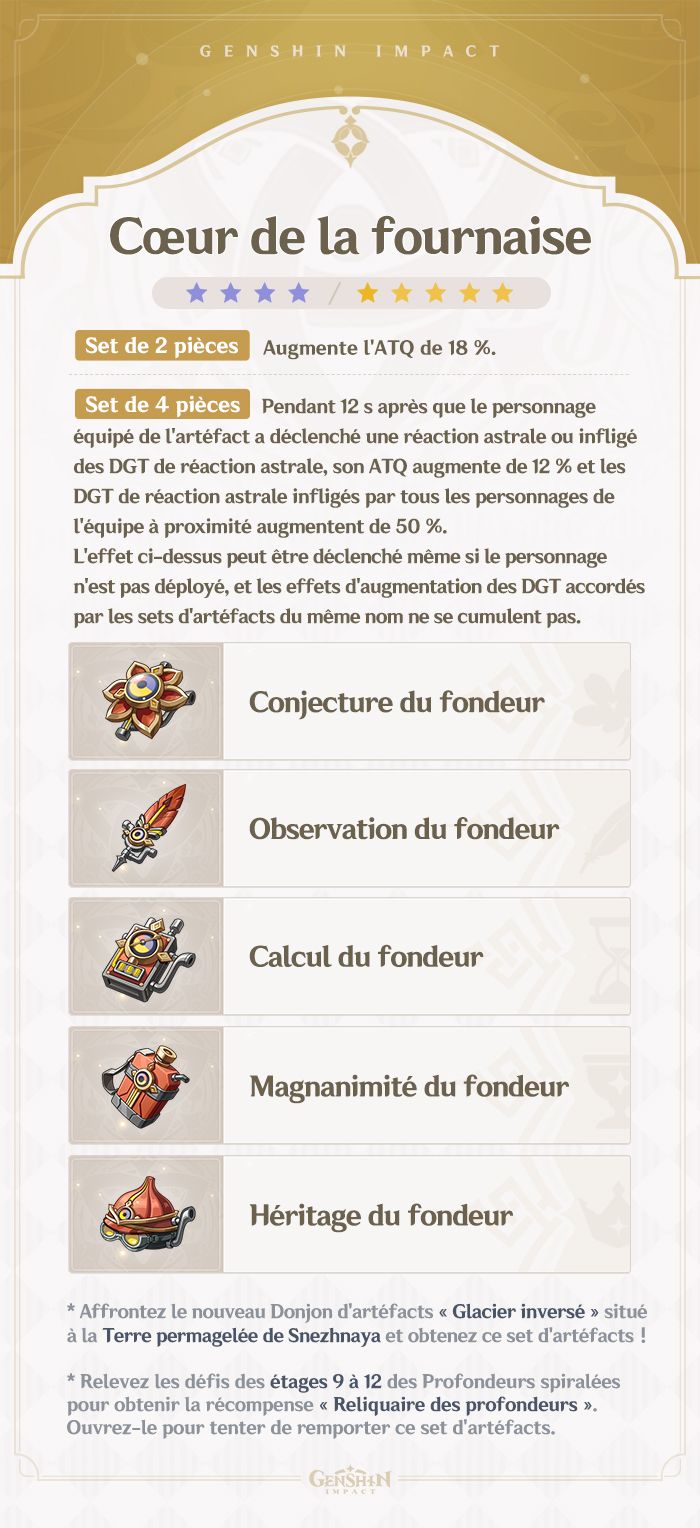
| Ember Heart | Increases ATK by 18%. | For 12s after the equipping character triggers a Stellar reaction or deals Stellar reaction DMG, their ATK increases by 12% and the Stellar reaction DMG dealt by all nearby party members increases by 50%. This effect can be triggered even if the character is not on the field, and the DMG increase effects granted by sets of the same name do not stack. |
As for the individual pieces, Scarlet Testimony is made up of Honor to Your Devotion, Glory to Your Legacy, Time Bestowed Upon You, Chalice of Your Blood and Pain, and Testament to Your Faith. Ember Heart lines up Smelter's Conjecture, Smelter's Observation, Smelter's Calculation, Smelter's Magnanimity, and Smelter's Legacy.
Ember Heart, the first true support set for Stellar reactions
The figure to remember is that +50% Stellar reaction DMG for the whole nearby team. No other set in the game offers a team-wide multiplier of this magnitude on an entire family of reactions — and above all, it covers both Stellar reactions, Stellaric Conduction as well as Stellaric Dispersion. A Cryo/Electro composition built around Stellaric Conduction benefits from it exactly as much as an Anemo/Cryo composition does.
The most important sentence is nonetheless the most discreet: "The above effect can be triggered even if the character is not on the field." In other words, the wearer doesn't need to be on the field to sustain the buff. A support who applies their element from the backline — a persistent skill, a summon, coordinated DMG — checks the condition on its own and maintains the 12 seconds while your DPS lands hits. That's what elevates this set from a personal bonus to a team-wide tool.
The second sentence not to skim over: "the DMG Bonus effects granted by artifact sets with the same name do not stack." Practical translation: only one Furnace's Heart per team. Equipping two characters with the 4-piece doesn't double anything, it simply wastes a second quality set.
One last thing to watch: the activation condition. The wearer must trigger an Astral reaction or deal Astral reaction DMG. A pure shielder or a healer who doesn't apply any element doesn't fulfill the contract: the set will stay dormant on them. Furnace's Heart is meant for characters actually built around the reaction, not for utility picks placed alongside them.
Scarlet Proof, a selfish set reserved for the Astral Dispersion trigger
Scarlet Proof plays exactly the opposite tune. Its 4-piece only exists for the character wearing it, it only activates after an Astral Dispersion reaction — Astral Conduction doesn't qualify — and it only lasts 10 seconds. It's a much narrower set, aimed at a single slot in a single family of team comps.
In exchange, it offers a stat found nowhere else on a reaction bonus: 16% CRIT Rate. The choice isn't trivial. Classic transformative reactions — Overload, Swirl, Superconduct — can't land critical hits; the fact that HoYoverse offers CRIT Rate rather than an Elemental DMG Bonus on a set entirely dedicated to Astral Dispersion suggests that this new DMG type is meant to be able to crit. This is a reading of the official text, not a measured value: it will need to be confirmed on August 12, but it already shapes how to build the character in question.
Who is this character? The one who triggers Astral Dispersion, meaning the Anemo character who disperses Cryo — provided a character capable of unlocking Astral reactions is present in the team. Useful reminder: Cryo Swirl only turns into Astral Dispersion if the team includes a character who unlocks the mechanic, and the Traveler gains access to Cryo — and therefore to the full set of Astral reactions — after interacting with the Statue of The Seven in Snezhnaya.
Who wears what on August 12
- Odette (5★ Cryo, one-handed sword): her passive turns Superconduct and Cryo Swirl into astral reactions, and her skill deals astral DMG while boosting the team's astral DMG. She's therefore permanently plugged into the system, making her the most natural candidate for Heart of the Furnace.
- The Cryo Traveler: same logic applies. Capable of triggering all astral reactions, they meet the 4-piece condition effortlessly — handy if you haven't pulled Odette.
- Alyosha (4★ Electro, polearm, given during the Archon Quest): his kit is built around Astroconduction. Scarlet Proof is therefore of strictly no use to him, since it only covers Astro Swirl. If he isn't already your Heart of the Furnace carrier, leave him on a classic support set.
- Your Anemo character, the one who swirls Cryo: they're the one, and the only one, who justifies a 4-piece Scarlet Proof.
One last point that's worth its weight in gold during the first week: both sets share the same 2-piece bonus, ATK +18%. As long as you don't have a proper 4-piece set, a 2 + 2 combo gives you ATK +36% right away, without depending on a single lucky roll. That's far from negligible for holding things together until the domain decides to cooperate.
Where to farm them, and why the 7.0 calendar matters
The Inverted Glacier is an artifact domain: like all its kind, it's accessible every day of the week, with no rotation. So you can head there as early as August 12, as much as your Resin allows.
Second source, often overlooked and above all free: both sets are also available through the Reliquary of the Depths, the reward obtained by clearing the challenges of floors 9 through 12 of the Spiral Abyss. You open it to try your luck at winning the set — no Resin spent. If you've been putting off your higher floors, now's the time to get back to them.
That leaves the Resin trade-off, and it's trickier than it looks. The Abundance of Prosperity event returns in this version: it doubles the rewards from talent-upgrade material domains and weapon-ascension material domains — including the new Snezhnaya domains — but not those from artifact domains. The upshot is clear: during the event window, your Resin should go into talents and weapons, while your artifacts should be farmed before or after. Getting the order of your week wrong literally costs you dozens of doubled rewards.
Also worth noting, two quality-of-life changes on the artifact side in 7.0: Night of the Sky's Revelation and Silken Moon's Serenade join the Mystic Offering system in the crafting table, and artifact storage capacity increases to 2,700. If you were about to do a panicked mass cleanup of your inventory, take a breath: more space is on the way.
The three things to do before Wednesday
- Don't let your Resin drop to zero. Aim for the 200 cap on the morning of August 12: that's two to three free runs at the Reversed Glacier right from opening.
- Build up your Condensed Resin. You can store 5 of them, equal to 200 Original Resin set aside, each costing 40 Original Resin, one Crystalline Core, and 100 Mora at the crafting bench. They're used in dungeons and prevent Resin regenerated during maintenance from overflowing.
- Save your Fragile Resin and set aside some Mora. Leveling up two 4-piece sets all the way is far more costly than getting them to drop in the first place, and many players end up stuck not by luck, but by their wallet.
The real question of the first week
It isn't "which set is the best." Scarlet Evidence and Fervor of the Furnace aren't competing for the same slot: the former is a personal bonus for an Anemo trigger, the latter a team-wide multiplier. The right question is "who wears Fervor of the Furnace," because that +50% is shared and doesn't stack — so there's only one decision to make, but it shapes the rest of your rotation.
The sensible plan looks like this: first aim for a 4-piece Fervor of the Furnace on the character who stays plugged into Elemental reactions the longest, hold with a 2+2 setup in the meantime, and only worry about Scarlet Evidence once the team composition is settled — especially since its value depends entirely on the still-open question, as of August 9, of how Elemental reaction DMG interacts with crits. Check back on August 12 to verify all this in the French client.
Share this article
Which of the two sets will you farm first on August 12?
Frequently asked questions
Does Heart of the Furnace really work off-field?
Yes, it's written right there: "This effect can be triggered even when the character is not on the field." A support character who applies their element from the background can maintain the buff on their own, which turns this set into a genuine team tool rather than a personal bonus.
Can I equip two characters with Heart of the Furnace to double the effect?
No, effects with the same name don't stack. Dressing two characters in this 4-piece set doesn't double anything and simply wastes a second quality set. One is enough to buff the whole team.
Why does Scarlet Proof only cover Astrodyne and not Astroconduction?
Scarlet Proof is a narrow set designed solely for the Astrodyne trigger, meaning the Anemo character who disperses the Cryo. It only exists for that specific character, unlike Heart of the Furnace, which supports both astral reactions.
Do I need Odette to use Heart of the Furnace properly?
No, Odette is just the most natural candidate. The Cryo Traveler does exactly the same job, since they're able to trigger all astral reactions and effortlessly meet the 4-piece condition.
Where can I farm these artifacts if I don't want to spend Resin?
Both sets are available for free through the Reliquary of the Depths, the reward from floors 9 to 12 of the Spiral Abyss. No Resin spent, but you need to be strong enough for those floors.
Key takeaways
- Heart of the Furnace boosts the whole team's astral reaction damage by 50%, even when its wearer isn't deployed
- Scarlet Proof is only worth it on the Anemo character who triggers Astrodyne, not on just any random character
- A single 4-piece Heart of the Furnace per team is enough, two is pure waste
- Odette is the natural candidate for Heart of the Furnace thanks to her passive that turns reactions into astral ones
- Before getting the correct 4-piece set, a 2+2 combo with 36% ATK lets you hold steady without relying on RNG
Comments
No comments yet. Be the first to react!
Leave a comment
Similar guides





Latest articles








Your opinion counts
Rate Genshin Impact
Click a star to rate