



 Fabian Lainé
Map
Battlefield 6: the Tsuru Reef map guide — island by island, rotations and key positions
In brief
Tsuru Reef punishes improvisation: this giant map splits into six distinct islands, each requiring a precise tactical approach. This guide teaches you where to set up your rotations, which sectors to lock down as a priority, and how to exploit base asymmetry to impose your own rhythm.
Three weeks after the Season 4 launch, Tsuru Reef remains the map that many players endure more than they actually play. The sixteenth Battlefield 6 map and the largest ever produced for the game, it does not forgive improvisation: heading out at random from your headquarters means swimming for two minutes only to die on a beach held by an organized squad.
The problem isn't the size, it's reading the map. As long as you don't know which zone controls the others, you're chasing the match. This guide follows the sector-by-sector breakdown given by the level design team and draws out what actually matters in-game: where to deploy, what to lock down first, which positions are traps. Better start now: on August 18, the play space grows even further with playable aircraft carriers, and the expansion will build on top of these landmarks.
The geography in one minute
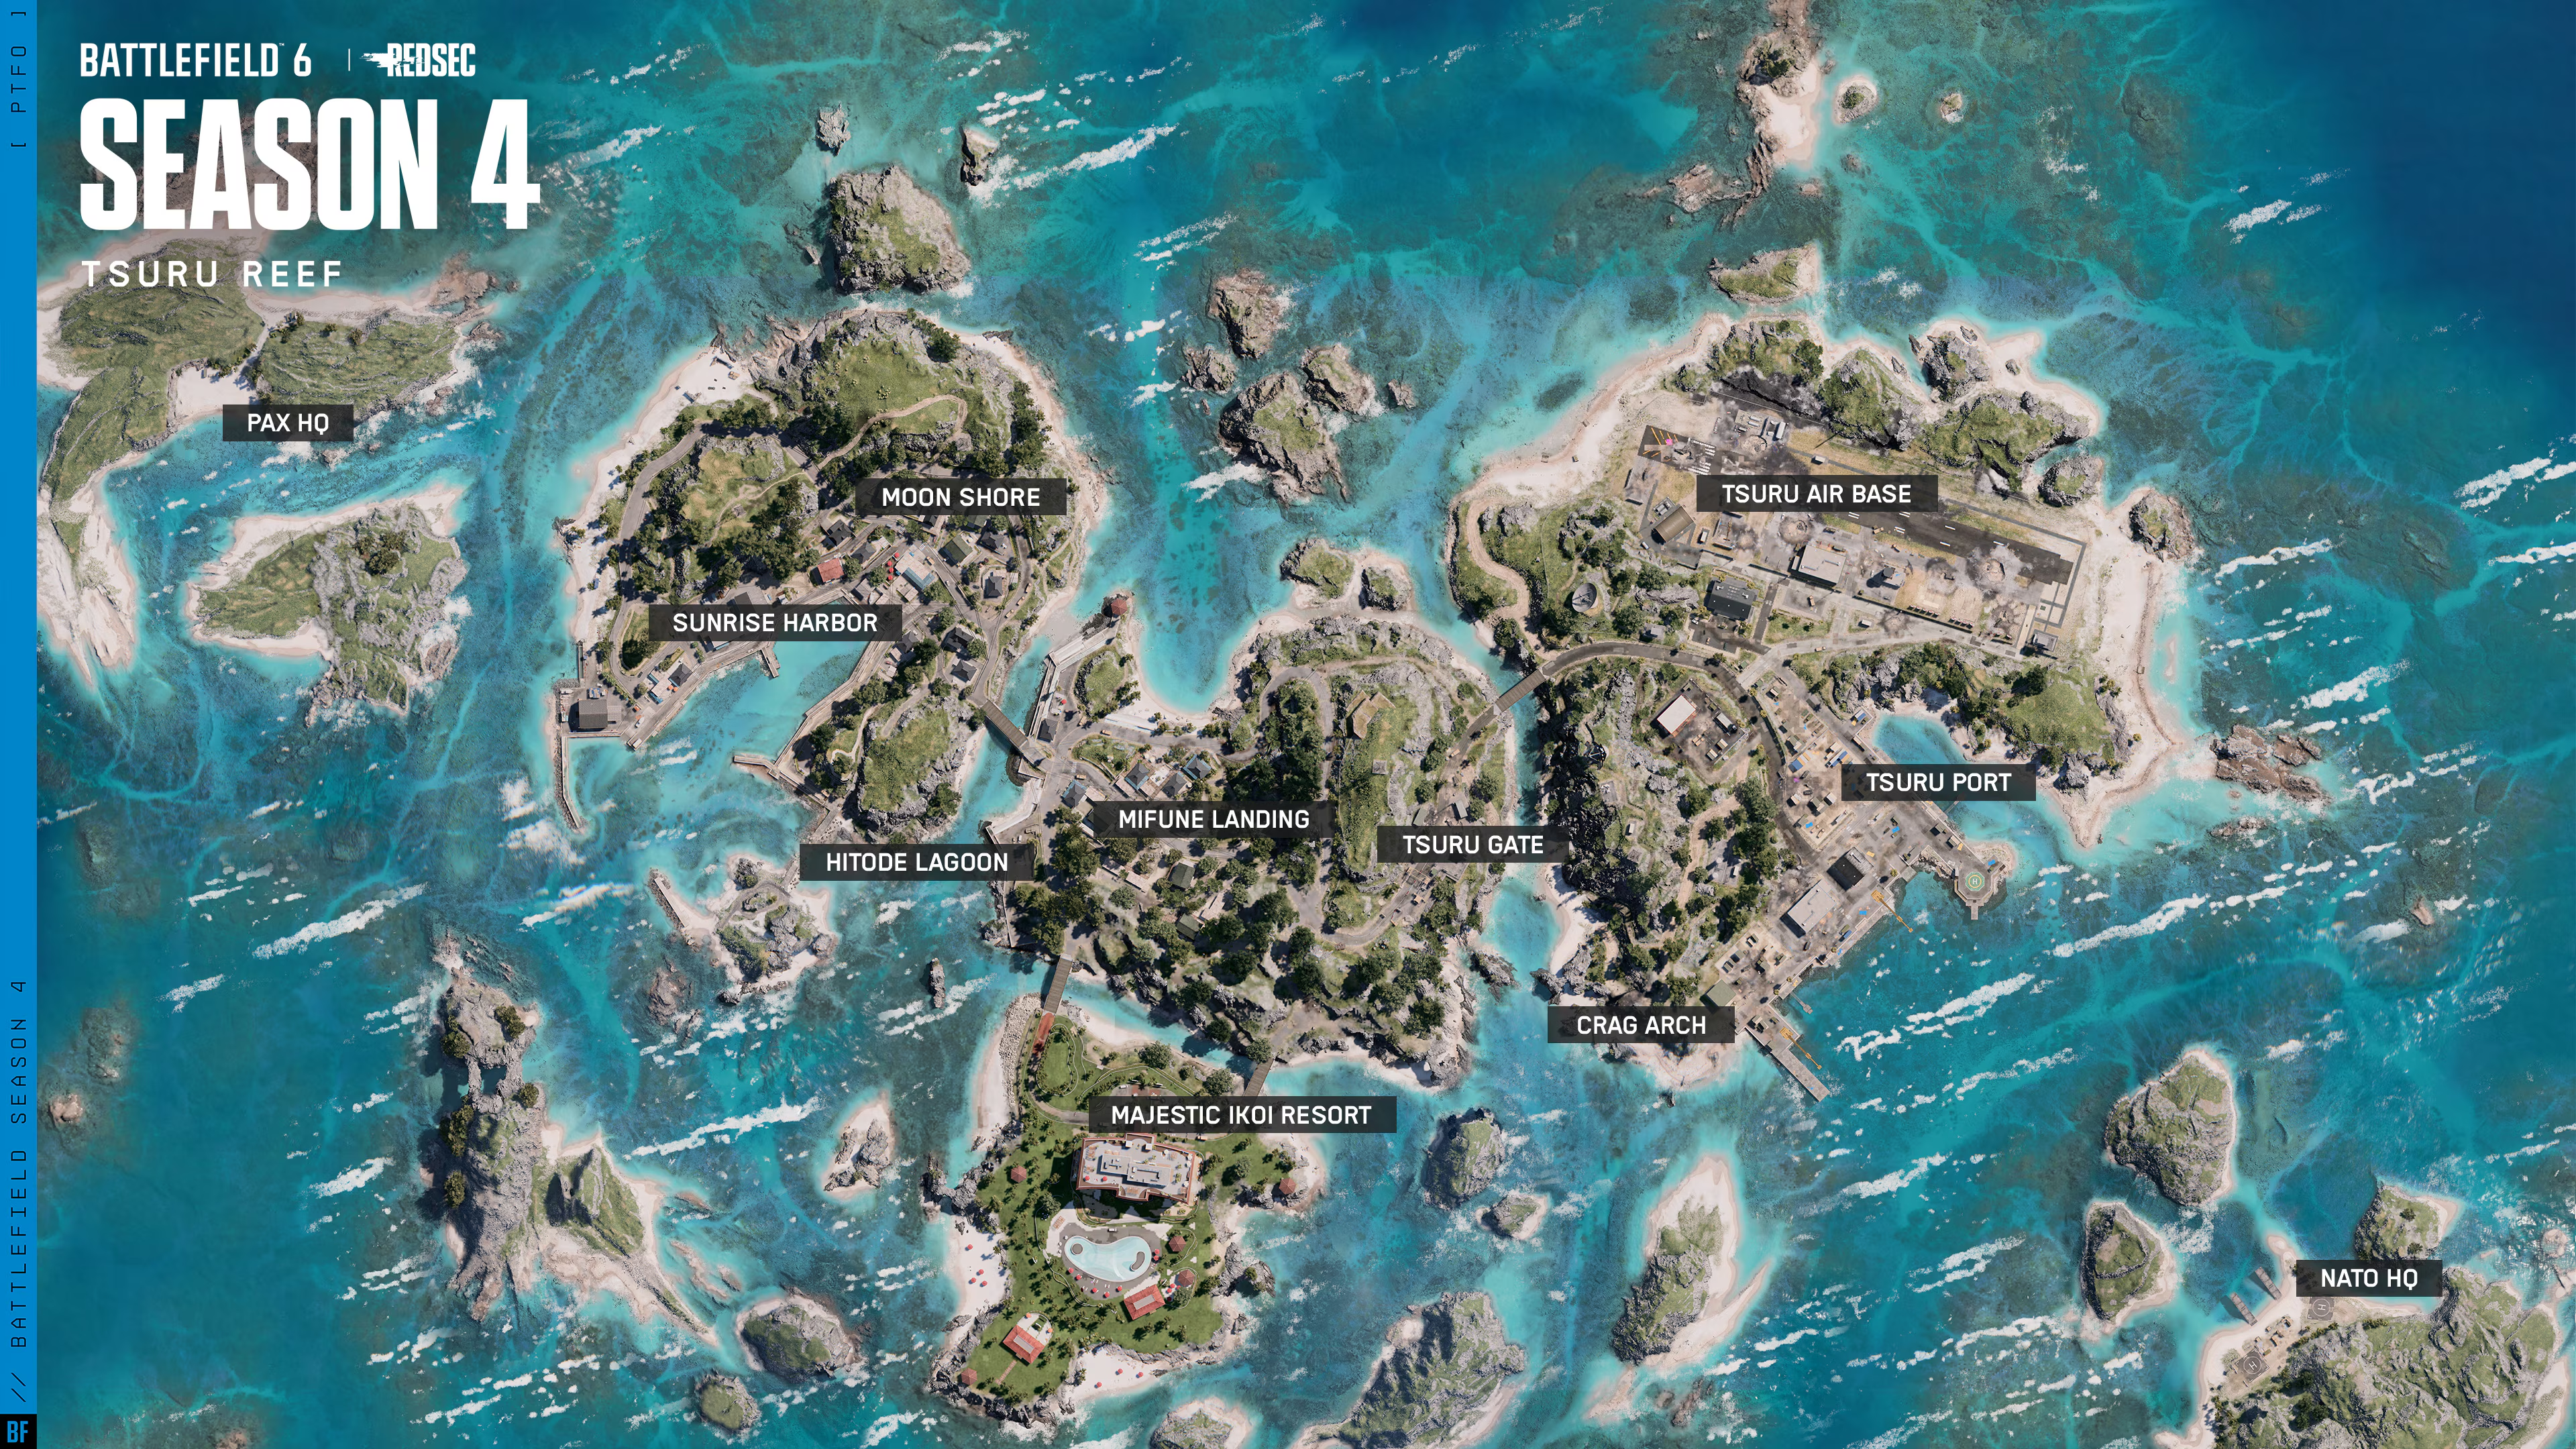
The reef is a chain of six islands: four combat islands and two islets reserved for NATO and Pax Armata headquarters. Each island carries a distinct gameplay identity, in line with the stated intent of Richard Starr, lead level designer on the map: some objectives are captured directly from a boat, others are infantry engagements backed by a naval presence.
| Island | Points of interest | What you'll find there |
|---|---|---|
| Kaze Island (center) | Mifune Landing, Tsuru Gate | Land bridges to every other island, rocks and vegetation |
| Mist Island (east) | Tsuru Airbase, Tsuru Harbor | Runway, warehouses, heavy destruction |
| Dusk Island (west) | Moon Shore, Sunrise Harbor | Abandoned village, U-shaped harbor for boats |
| Yumeji Island (south) | Majestic Ikoi Resort | Luxury hotel, pools, close-quarters combat and open areas |
Three additional landmarks often decide engagements: Mount Hoshizora, a dormant volcano whose name means "starry sky", the Arch of the Steep Rock facing the hotel resort, and the Hitode Lagoon, which connects the western island to the rest of the reef via the south.
A detail that changes the first five seconds of a match: base asymmetry. Pax Armata's barrier island sits closer to the main coastlines, which makes an on-foot crossing realistic on that side; in Conquest, NATO conversely has easier access to the military island. Your logical opening move is therefore east as NATO, the residential west as Pax Armata — and the center remains the real prize for both sides.
Kaze Island: the map's lock
This is the zone to understand before all others. The central island opens land bridges to all the main islands: holding it means dictating the pace of rotations to your opponent, who is forced to go back through the sea.
The Mifune Landing is the archipelago's old art revitalization project, now emptied of its inhabitants; Tsuru Gate is the Japanese-American checkpoint leading to the military base to the east. Both play out on the ground, with plenty of natural cover: a squad hugging the rocks and vegetation goes largely unnoticed and can pop back out to the northwest, northeast, or south.
Practical consequence: don't roll onto Kaze in a tank, visible from three sides and served up to enemy launchers. The right vehicle is the light transport that drops you off and heads back out, followed by a spawn beacon behind the ridgeline. The wrong instinct is to camp Tsuru Gate in passive defense: the area can be flanked from the south and through the shallows.
Mist Island: airbase, port, and destruction
The military island is the one where tactical destruction weighs the most: the infrastructure there is fragile, elevated vantage points disappear as the match goes on, and the fight falls back to ground level. Don't build your plan around a specific rooftop — it won't be there by the third sector.
The runway at Tsuru Airbase, even partially destroyed, stays long enough for a pit stop or a touch-and-go: setting the aircraft down for a few seconds breaks an enemy lock-on and repairs the airframe. It's the most underused tool on the map for pilots. The downside is that the runway sits in contested territory and within range of open water.
To the south, the Steep Rock Arch faces the hotel complex. Natural cover is essential there, and a few piles of rubble — including the wreck of a helicopter shot down from the airbase — serve as occasional shelter. It's a passage corridor, not a position to hold.
Dusk Island: the meat grinder at Rising Sun Port
A long-abandoned tourist island, Dusk favors close-quarters combat, with a U-shaped harbor built for naval vehicles. That's the trap: from the docks, sightlines sweep across the island's interior just as they do the open water. The sector is deadly no matter which side controls it.
It's therefore Scout and Engineer territory: the former lock down the bay, the latter punish boats that enter the U. If you're playing Assault or Support, don't cross the promenade out in the open — go through the abandoned houses, the warehouses, or the tree line overlooking the village. Smoke isn't a luxury here, it's the price of entry.
In the southeast corner, Hitode Lagoon connects Dusk to the island housing the Mifune Landing and the Majestic Ikoi Complex. The cliff offers a long-range observation post, but it's exposed from every direction, including the waterway leading up to the port.
Yumeji Island: the Majestic Ikoi Complex
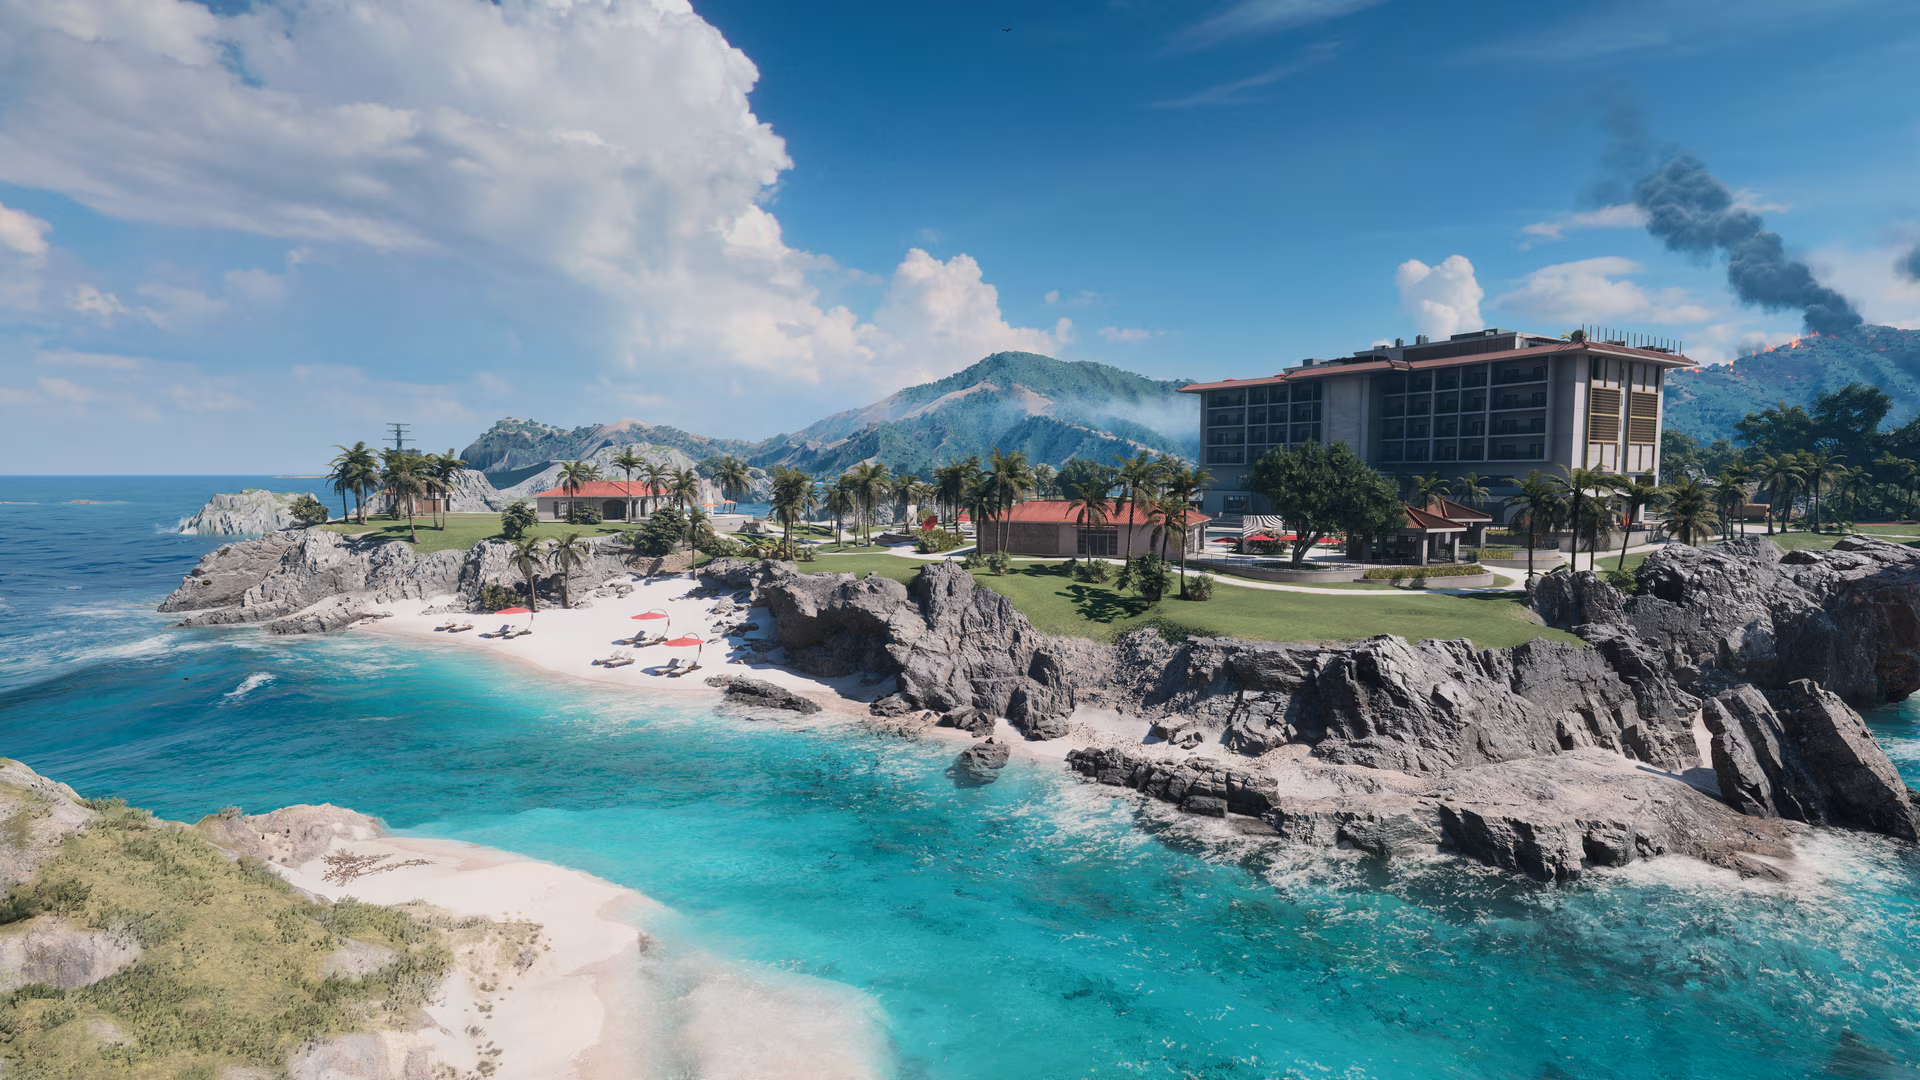
The hotel complex is the major capture point of the chain's central segment, embraced by the development team as a nod to Hainan Resort, the Battlefield 4 map. It mixes tightly enclosed areas — rooms, corridors — with open spaces around the outdoor pools.
The key takeaway fits in one sentence: its luxury renovations didn't pay for reinforced walls. The main building and its villas can be dismantled by the patrol boat, from a plane, or with the Engineer's arsenal. A dug-in defense on the upper floor is therefore never a sure thing: open your own sightlines rather than clinging to the existing windows.
To the east stands Mount Hoshizora: uncapturable, it offers an elevated view of the islands, but one that is completely exposed. Treat it as a ten-second observation post, never as a nest.
Water is cover, not an obstacle
Season 4's dynamic wave system isn't just for boats. When you're not embarked, diving under the surface and using the swell genuinely protects you from incoming fire: bullets only penetrate water to the extent of their caliber. Transport and revives also work in water, which makes a squad much harder to wipe out on an amphibious approach.
Second point, often overlooked: shallow waterways let you move from one island to another without using the bridges, exactly where the enemy has laid their mines and aimed their launchers. If your squad dies three times in the same spot, the answer isn't a fourth assault.
Beacons, the reef's secret weapon
Mount Hoshizora and the unnamed islets award no capture points, which paradoxically makes them valuable: no one fights there. They're the best spots to place a deployment beacon halfway between several objectives. On a map this size, cutting out the trip from headquarters is worth more than a good duel.
What changes depending on the mode
The map supports both All-Out Warfare and the tactical modes: Conquest, Breakthrough, Rush, Domination, and King of the Hill don't play out the same way on an archipelago.
- Conquest: the developers' advice is unambiguous—securing the central island gives a direct advantage over capturing the neighboring islands. Naval rotations take priority over duels.
- Breakthrough: the Pax Armata has an insertion sequence unique to this map, spelled out in the 1.4.1.5 patch notes. On defense, hold the beaches and port entrances, not the back of the sector; on offense, smoke and the alternative coastal approach are better than a frontal landing.
- Tactical modes: shorter stretches, naval vehicles far less decisive, and landmarks that become interiors again—the hotel, the warehouses, the village.
What update 1.4.1.5 fixed here
Rolled out on August 4 at 8:00 AM UTC, 1.4.1.5 is a reliability pass, and three fixes directly concern this map:
- players now correctly appear during the Pax's insertion sequence in Breakthrough on Reef of Tsuru;
- visual corruption near objective C, which caused intense flickering, has been fixed;
- on PC, a driver crash on certain NVIDIA GPUs occurring notably on maps with large bodies of water has been addressed.
If you'd given up on the map for any of these reasons back in July, it hasn't played the same way for the past week.
On August 18, the map gets bigger
The mid-season update adds playable carriers: the USS Grant on the NATO side and the PXS Condor on the Pax Armata side, alongside the redesigned return of the Carrier Assault mode. In practical terms, the stretch of water between the two headquarters will stop being a transit corridor and become an objective in its own right. Squads that have already automated their rotations between Kaze, Mist and Dusk will know what to do with these new footholds; the others will discover an even bigger map without mastering its foundations.
The decisions that win games
Here, the end-of-match ranking rarely rewards the best shooter: it rewards the squad that stopped wasting time in transit. Three calls matter more than any weapon tuning. Choosing Kaze as an anchor point rather than the objective closest to your base. Placing a beacon on a neutral islet before launching an assault, so that the first death doesn't cost you the position. And refusing bridges as soon as they become predictable, even if it means paying twenty seconds of swimming.
Share this article
Which sector of Tsuru Reef frustrates you the most?
Frequently asked questions
Why avoid tanks on Kaze Island?
Tanks are visible from three sides and served up to enemy launchers. Favor light transports that drop you off and leave, then consolidate with a beacon in the second line.
How do you cross Rising Sun Port without getting wiped out?
Forget strolling through in the open: go through the abandoned houses, the warehouses, or the tree line overlooking the village. Smoke isn't a luxury, it's the price of entry.
Can you really fight underwater on this map?
Yes, diving protects you from incoming fire since bullets only penetrate water in proportion to their caliber. Transport and revives also work there, which makes an amphibious squad much more resilient.
Is the majestic Ikoi Complex really untenable on defense?
Exactly. Its walls aren't reinforced: the building can be torn down by the patrol boat, from a plane, or with the Engineer's arsenal. You're better off opening your own sightlines than clinging to existing windows.
Where should you place spawn beacons to maximize their impact?
Mount Hoshizora and the islets with no capture points: nobody fights there. These are the best spots halfway between several objectives, since cutting out the trip from headquarters is worth more than a good duel.
Key takeaways
- Kaze Island is the strategic linchpin: holding it forces the enemy to go around by sea and dictates rotations.
- Forget fixed positions, tactical destruction makes them obsolete: adapt your firing spots instead of camping on a rooftop.
- Water isn't an obstacle but cover — dive to cross without taking bullets to the face; spawn beacons on neutral zones are worth more than a good duel: they're your secret weapon for controlling the tempo.
- Base asymmetry pushes you east for NATO and west for Pax from the very first seconds, but the center remains the real stake.
Comments
No comments yet. Be the first to react!
Leave a comment
Similar guides
Latest articles







Your opinion counts
Rate Battlefield 6
Click a star to rate